Tuesday, August 30, 2011

Sewing Project #3, Awesome Bib!

Hello Blogland,
I have yet again beaten the sewing machine into working properly!! YAY.  I'm so excited about this project, and love the fact that I made everything by myself (with a bit of pinning help from Josh, because I didn't want to cut my big sheet of plastic that my mom gave me).

Okay so here's the tutorial I used (complete with pattern).  I first saw the 'Bapron' (yes I hate the name, but don't know what else to call it) on this blog where this lady tried it and failed because she used bias tape that was too thin and an ultimate pain in her butt!  However, she linked back to the original tutorial that I used, so that's how I found it.  Now here's the one I made!!


I know it's hard to tell how big it is, but it's going to be for Nova, who is under 3 months right now (2 and a half ish?), so I don't think she'll have a problem fitting into it.  Maybe I'll make the boy model it for me so I can get a feel for the size, see if I need to make them a bit bigger.. I'm sure he'd love it.

So the tutorial said to use flannel as a backing, but I've used plastic sheeting that my mom gave me (thanks Mom!!).  It should still be machine washable, but just using cold water I'd think... and may not work in the dryer... especially my super-heat-creating European dryer, that think will cook things I'm sure!
Here's the back:


OMG I'm so happy with this project!  I can't wait for them to get used!  ( I say 'them' because OBVIOUSLY I'm going to make like a million more...)

However, my next project is a fitted crib sheet, or two.  I have finally found the fabric I like IN STOCK and it's in the dryer right now. Soo  After lunch and a bit more house work, I should be able to at least get started on that!

Wish me luck, and thanks for looking,
Mandy

Saturday, July 23, 2011

Back to Stampin'! (while I wait for fabric to be delivered)

Hello Blogland,
I just wanted to share this School layout I just did.  My printer isn't working - more specifically my COMPUTER isn't allowing me to print - at the moment, so I had to find something to do with pictures that were already printed.
Andrew's first school year was last year.  Pre-Kindergarten!  He really enjoyed it, and is looking forward to seeing his friends again during the next school year.  I'm looking forward to Kindergarten because they allow them to be bused, unlike Pre-K!

So here's the layout:

I cut off about an inch of the page in the picture, because the bottom of the class photo has the school logo, etc.  Just in case.
Anyway I just realized that there's actually NO stamping on this page! LOL, it's all stickers and the letters are CS cut out with the BigShot!  If you can't read it, the red part with SCHOOL in between says "I like {SCHOOL} because..."  Also, I've left space at the top of the page, I want Andrew to write his name, but he's not here at the moment, so hopefully I will remember to ask him before he starts the next school year.  I hope to make a similar page every year and have him write his name to show his progress :)

Thursday, July 21, 2011

Sewing Project #2, Crayon Roll

Okay so I got this idea from Lindsey @ The Pleated Poppy.  She has a GREAT tutorial (Obviously or I'd never have been able to do it!).
I used only one design of fabric, which is one reason her's looks much better than mine, but also the fabric I used was super thick, and the sewing machine I'm using had quite a bit of trouble with all the layers.  However, it really didn't take me very long and I think I will make a few more of these, especially when I get the fabric I bought online a few days ago!!  All girly, of course, for bibs - or more specifically 'Baprons'!   One of these will be my first project when I get the new fabric!  Can't wait.
While it's not the prettiest thing in the world, my son has it in his 'rolly bag' (what he calls his little backpack with wheels that he uses as carry on) on the plane right now, so I know it's going to get lots of use.
*I know it's called a Crayon Roll, and he has mini Pencil Crayons in his, but that's all we could find.  I finished it yesterday and he flew out early this morning!*

I have found the pictures of the Boden Baby Scrapbook that I knew I took but couldn't find, so I will be adding that project on here too.  I didn't take pictures of all the pages, because I was just trying to get it done!

Take care,
Mandy
Posted by Picasa

Thursday, July 7, 2011

Sewing!!!

Okay, I know it's been AGES and I have lots of scrappin/stampin projects that I've done and need to blog about, but I am so impressed with myself that I had to do this one NOW!
So two days ago my husband brought home a sewing machine for me (borrowed, one of his work friends picked it up for me and gave it to him) to teach myself how to use.  I've wanted to do this for a few weeks for a few reasons.
1) I've been blog surfing and found quite a few blogs of ladies who make their daughters cute little dresses, and bibs, and bags, and pretty much anything that's made of fabric!  and the catch - a lot of them give tutorials and patterns!!
2) After looking for quite a while for cute sheets for the baby's crib, I've decided that I want to use a fabric I found at Ikea - where we got the crib - and make some fitted sheets.  The internet gods must approve of this because they've provided me with LOADS of tutorials for that as well.
So today, I finally got the machine out and figured out how to thread it etc (a bit tricky with the user's manual in French) but I got it!  And after one test piece, to see what all the knobs and switches actually do, I made this:

 (Can you tell I'm a bit excited about it?)

AWESOME (but yes, simple) HEADBAND out of one of my comfiest pairs of sweatpants (so comfy they were getting holes in them!)  Anyway I got the idea from Jess @ Craftiness is Not Optional and her tutorial for Baby Headbands!  I was going to start with a little one, but when you're learning how to work something, it's nice to have extra fabric to hold onto.  My plan is to make baby headbands (and toddler headbands, and preschooler headbands, etc. etc.) once I get some experience and some better cuter fabric.

I CAN SEW!!!

Sunday, April 17, 2011

Scrapbook for Baby Shower Gift

Hello,

So I've finally started making the scrapbook for my friends whose first born is due in June!  They aren't telling the gender of the baby which I am finding quite frustrating, so we are going for neutral here, people...  The theme of their shower is Safari, so I went with Safari colours, Orange, Brown, Bright Green, and Yellow (or in SU! terms Pumpkin Pie, Chocolate Chip, Kiwi Kiss and Crushed Curry.. with a little Crumb Cake thrown in every now and then).

Here is a picture of the first page:


I wanted to start with a few that I could complete, like this 'Our Family Before Me' page.  I thought it was a great way to start a baby book (It really helps that one of their wedding colours was orange! Perfect!).  Next will be 'On The Inside'  or maybe 'Life on the Inside'  with an ultrasound picture as well as a belly pic of Mama, etc.  Stay tuned...

Thanks for looking,
Mandy

Sunday, April 10, 2011

Colour Inspiration Challenge #154

Hello again,
It is a BEAUTIFUL weekend here in Belgium... People told us it only rained here, but so far we've had three weeks of snow at Christmas and all March and April have been sunny!  So who knows about weather anymore... but I'm surely not complaining.  I quite enjoyed these colours together, and I kind of used a sketch from a few weeks ago from Stamping 411 ( 1 ♥ them!) to go along with it.
Here are the colours for the Challenge:


And the sketch I used (even though that challenge is over):

And finally here is my Card:

It's kind of hard to see the words on the jewelry tags but it says "find joy in the little things".
To make this card, I used Chocolate Chip CS for the card base.  Three squares of Always Articoke CS 1 3/4", underneath the three whisper white CS squares that are 1 5/8".  I used Rub-Ons from the Lovely Flowers Bundle Hostess Set from the 09/10 Idea Book & Catalogue (IBC) for the three flowers as well as the sentiment.  The flowers were coloured in using Stampin' Pastels.  The square I used was supposed to be Rose Red, but I'm pretty sure it's exactly the same as the Real Red square...  But it looks okay anyway!
The Jewelry Tags are on a string of Linen Thread secured at each end with a Jewels Basic Pearl.  The Chocolate Chip Ribbon also has some Pearl bling added.  And that's it!

Thanks for Looking,
Mandy

Friday, April 8, 2011

Manly Cards... so tricky!

Hello again,
I've not much time but I wanted to stick this non-girly card up... just because!
Here it is:


I like it. Night of Navy, Pumpkin Pie, and Crumb Cake make up the colours!

Thanks for looking,
Mandy

I'm in the Stamper's Showcase!!!

Wow!  After only doing two or three challenges, I've been chosen (one of the five) as the operators' favourite for this week over at Stamping 411!!!
For those of you who don't know what that means, it's just an honour essentially.  I don't get a prize or anything, I just get to know that these 8 SU! Demo's and veteran stampers admired my card!  Wait til I tell Aunt Dorothy after she gets it in the mail for her birthday!
You can see the other showcase winners here.

Thanks for looking,
Mandy

Wednesday, April 6, 2011

SSC197

Hi!!
Yeah, it's been a while I know, but I've been super busy!  Haven't stopped crafting (mostly making birthday cards) but was slacking on the posts, Sorry!

However, I have a new card to show off here.  It's for the Saturday Sketch Challenge #197, but I also used the latest Color Inspiration (#153)  from Stamping 411 as well!  Here is the Color Inspiration:


And the Sketch:


And my Card:


Isn't it pretty?  I'm quite happy with it.  And hopefully so will my Aunt be, as she will be getting it very late for her birthday!  (I made it ON her birthday and I live across an ocean from her so mail isn't exactly a day or two!)  But anyway, better late than never, right?  Here's what I used to make the card:

Whisper White CS: 8.5" x 5.5"                                             Scallop Trim Border Punch
Pretty in Pink CS: 5.25" x 4"                                                 Vintage Vogue Stamp Set
Night of Navy CS: 5.25" x 2.5"                                             Well Scripted Stamp Set
Old Olive 5/8" Satin Ribbon                                                  S-A-B Bliss Stamp Set
Vintage Brad                                                                        Filigree Brad
Whisper White Craft Ink                                                      Night of Navy Classic Ink
Pretty in Pink Classic Ink                                                      Old Olive Classic Ink

I did do quite a bit of cutting out shapes with this card, but I didn't have anything else I could have used to keep to the sketch.  I stamped both the flowers from the Vintage Vogue Set first in Pink, then just around the edges with Navy onto Whisper White CS.  I love this technique, but I have no idea what it's called; or even if it has a name!  I cut out both flowers and the Olive Butterfly from the Bliss Set.  I stamped the background decoration from the Bliss Set with Navy onto the Pink CS before adding the Navy CS (punched on the bottom with the Scallop Trim) and Olive ribbon.  The sentiment from the Well Scripted Set was stamped with Whisper White Craft Ink, but if I had thought about it earlier I would have heat embossed it with White as well!  And that's about it!

Coming up next; I have yet another Man Birthday Card... That pickup truck from Loads of Love is really getting a workout!

Thanks for Looking,
Mandy

Friday, February 18, 2011

Attempts for C&S Christmas Cards

Hello Blog Ppl,
I wanted to share a few REALLY quick cards I made.  I got the idea from the Clean & Simple posts over at Stamping 411.   They are really great for a nice card in a short time.  Anyway here are what I came up with:


One of the ladies from the MFRC community asked me to come up with some ideas for cards to sell at one of the charity events we Canadians annually participate in here in Belgium, and I've started with the most basic, and will get progressively more detailed (read: expensive) as I go.  And for these the only cost is half of a sheet of CS each!  I dont think a card can get any cheaper to make than that!

I will post the next batch when I'm finished them!

Ciao

Saturday, February 12, 2011

Gift for 1st Birthday

Hello again Blog World,
Now that I have this blog, I couldn't help putting pictures up of this really cute gift I made for one of my best friends' 1 year old girl.
I got the idea when I was giving my son's room a good organizing, sorting toys, etc.  I found a little block set that was not only missing a block - which was important as each block formed part of a picture, like puzzle pieces - but with which he was way past too old to play.  Then I got to thinking... Hmm, there are five blocks left, I bet I could cover them with cute girly papers and things and conveniently there are five letters in the name Jenna, who's birthday party I'm going to in a few weeks!  Perfect! :)

I started by ripping off the paper that was on there because it was glossy and I didn't think things would stick very well to it.  Then I covered it with all different styles from the Sweet Pea DSP Stack.


For the front - where the letters of her name are - I used two layers of mostly random Sweet Pea paper or correspondingly coloured CS, then added a Whisper White Scalloped Heart of Hearts before sticking on the letters.  I coloured the letters from the Loads of Letters Chipboard with Chocolate Chip Stampin' Write Marker.


For the top I used some Sweet Pea Stitched Felt, the Modern Label, Curly Label and 1 3/4" Scallop Circle Punches.  The Stamp sets I used are Little Angel, Tiny Tags, Vintage Labels, Short & Sweet and Outline Alphabet Lower (which is from 1998!).


I really love this gift!  So much in fact that I'm asking my Dad to make me some more blocks out of any scrap wood he might have laying around... they've been renovating their house since they bought it in 1988, so I think they might have some!  I would love to make these for other people, they'd be GREAT baby shower gifts!

Cheers,
Mandy

First Crafting Post!!

Here it goes... I've been checking out the blogspot.com blog called Stamping411 lately and it has hugely inspired me to get my butt in gear and start doing some of their challenges.  It's mostly just for fun, but it will hopefully get me going enough to book a class at the MFRC or with Andrew's class moms or something.

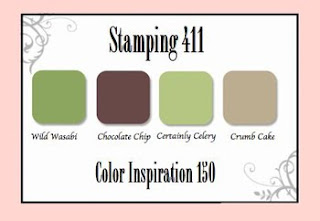
So I have done this Thursday's Color Inspiration Challenge #150!!   with one exception... the colours were Crumb Cake, Chocolate Chip, Certainly Celery and Wild Wasabi and I have nothing in Wild Wasabi, so I swapped it for Old Olive.. I hope that's okay!

I'm going to try to post the colours on here:


And now I just have to take a picture of my card...


Stampin FUN!! (I hope the links work!)